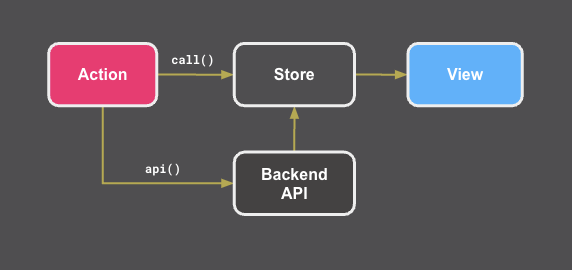
Architecture
@uteamjs is an open source framework built on top of the most popular libraries including React, Redux, React-Router, Bootstrap, Isomorphic Fetch, Node.js, Express ... etc. The primary purpose is NOT to replace the existing function of the existing library. @uteamjs is designed to enhance the usability, learning cycle and quality of overall application development on the existing libraries. @uteamjs lets you focus on the core logic, so you can do more work with less code.
@uteamjs seamlessly does data fetching with the backend RESTful API without any coding. The backend server does not necessarily run on Node.js, any RESTful API compliant server will do. The front end action is dispatched to the backend API automatically by setting up the Module/Component structure properly. @uteamjs backend functions will handle the asynchronous flow control and database access.
Flux Simplified
#@uteamjs follows the unidirectional flow Flux architecture designed by Facebook using Redux as the Global State Store. There are two helper functions call() and api() that automatically dispatch actions to the Store, or dispatch to asynchronous Backend API then update the Store. The Dispatcher in Flux Architecture is transparent to the developer.

For more details on Flux Architecture, please refer to Facebook Flux
You DO NOT have to
#Single File Components
#A clean and simple file is used to define the state, actions and layout of the components. No more boilerplate is required to create the Redux enabled JSX elements. Developers can focus on building the core application instead of spending time on repetitive overhead coding.
Example
#Let's use a simple todo list example with only add items to illustrate the @uteamjs architecture.

@uteamjs/react is the only main module required to import.
import { utCreateElement, utReducer } from '@uteamjs/react'
import { Button } from 'react-bootstrap'
import { Button } from 'react-bootstrap'
Step 1- Define the Reducer
#utReduce() is the helper function to initialize all state variables and actions. Each Reducer must have an unique identifier, which is ‘react-example/react-example-simple-todo’ in this example.
const reducer = utReducer('react-example/react-example-simple-todo', {
init: {
fields: {
todo: {
hint: '... enter items here'
}
},
todos: []
},
actions: {
add: (_, item) => _.todos.push(item)
}
})
init: {
fields: {
todo: {
hint: '... enter items here'
}
},
todos: []
},
actions: {
add: (_, item) => _.todos.push(item)
}
})
add is the action with two parameters:
_ - state object representing all state variables in the Reducer
item - object passed by the caller.
NO return value is required.
Step 2- Define the Layout
#Next step is to define the layout component. The following objects are injected as parameters:
_
Object contains all state variables in the Reducer.
Field
Form component provided by @uteamjs.
call
Function to dispatch actions in the Reducer.
const layout = ({ _, Field, call }) => <>
<Field id='todo' />
<Button onClick={() => call('add', _.fields.todo.value)}>Add</Button>
{_.todos.map((item, i) => <div key={i}>{item}</div>)}
</>
<Field id='todo' />
<Button onClick={() => call('add', _.fields.todo.value)}>Add</Button>
{_.todos.map((item, i) => <div key={i}>{item}</div>)}
</>
<Field> automatically bound to the _.fields object using the id as the key, in this example ‘todo’.
‘_’ is the state object for all variables in the Reducer.
<Button> onClick triggers the call(‘add’, _.fields.todo.value) function. ‘add’ is the action name and
_.fields.todo.value is the parameter get from state.
For the ‘add’ function inside the reducer, the ‘item’ is being pushed to the _.todos array[]. You do NOT need to return the state object because state mutation is done automatically.
Step 3 - Create the Element
#Finally a standard JSX element is created with the Redux store. utCreatElement() is the function for connecting the reducer to the element by injecting different properties into the layout component.
export default utCreateElement({ reducer, layout })